
.avif)

Handing over a Webflow site should feel smooth.
But in reality, it often means scrambling to share files, answering the same questions again, and fixing small issues that pop up after launch.
The problem isn’t the work you’ve done; it’s that there’s no single place where all the important details live. Without that, clients can get confused, you spend extra time on support, and launches feel messier than they should.
The Webflow Client Handoff Toolkit fixes that. It’s a ready-to-clone Notion template where every link, file, and instruction is neatly organised. You can use it on any project and give your clients the tools to confidently manage their site from day one.
In this article, we’ll show you what’s inside, why it matters, and how to use it on your next handoff.
What this toolkit is
The Webflow Client Handoff Toolkit is a master checklist built in Notion that you can duplicate for any project.

Each row covers a specific handoff item, from the Figma file and brand assets to SEO settings and 301 redirects, with:
- What it is so that clients understand its purpose
- Where to find it so they can access it instantly
- Official docs or tutorials so they can learn more on their own
- Client-friendly notes to explain what to do and what not to change
It’s designed so you can fill in the blanks with your own project links, upload any key files, and share it with your client along with a quick video walkthrough.
The result? Your client gets a clear, organised handoff package, and you get fewer back-and-forth messages after launch.
Why do you need this
Handing off a Webflow site often breaks down because the important details are scattered across emails, drives, and chat threads. That’s where this toolkit helps. It makes the handoff simple, repeatable and obvious.
- Keep everything in one place
One Notion workspace holds design files, Webflow links, CMS templates, SEO checks and passwords or DNS notes. No more hunting through emails. - Cut support time
Clients get clear, client-facing notes and official docs in one spot, so they can self-serve instead of asking you the same questions again. - Help clients own their site
Editor how-tos, a Loom script, and quick guides mean clients can edit content safely without touching the Designer. - Keep branding and structure consistent
Style tokens, component libraries, and URL guidelines reduce accidental style drift and broken pages when clients make updates. - Reduce launch risk
A single checklist with staging links, redirects, and SEO items lowers the chance of missed steps on launch day. - Speed up future handoffs and hiring
New devs or contractors can get up to speed fast because the project’s context and links are already documented.
Who this toolkit is for
This toolkit helps any team that needs a repeatable, low-friction way to finish Webflow projects and hand them to clients or internal teams.
- Freelancers:
Quick projects, tight timelines. Use the template to gather Figma links, brand files and the Webflow transfer link in one place. Record a short Loom and send it with the toolkit to avoid chasing assets and credentials after launch. - Small agencies:
Multi-page builds with multiple stakeholders. Add links to your component libraries and style guide to prevent layout drift. Document naming conventions and "safe to edit" fields so clients can update content without breaking design. - In-house teams:
Marketing and product teams who need a faster ramp-up for new hires. The toolkit contains fields for analytics IDs, CMS templates, and form settings so new team members can find what they need on day one. - Contractors and consultants:
Short-term contributors can use the toolkit to see what was delivered and where to make safe edits, reducing onboarding time and handover errors.
How to know if this is right for you
- You spend more than 1 hour per handoff on follow-up emails.
- Multiple people make edits, and global styles break.
- New hires take longer than a day to find key assets.
If any of the above sounds familiar, this toolkit will save you time and reduce mistakes.
What’s inside?
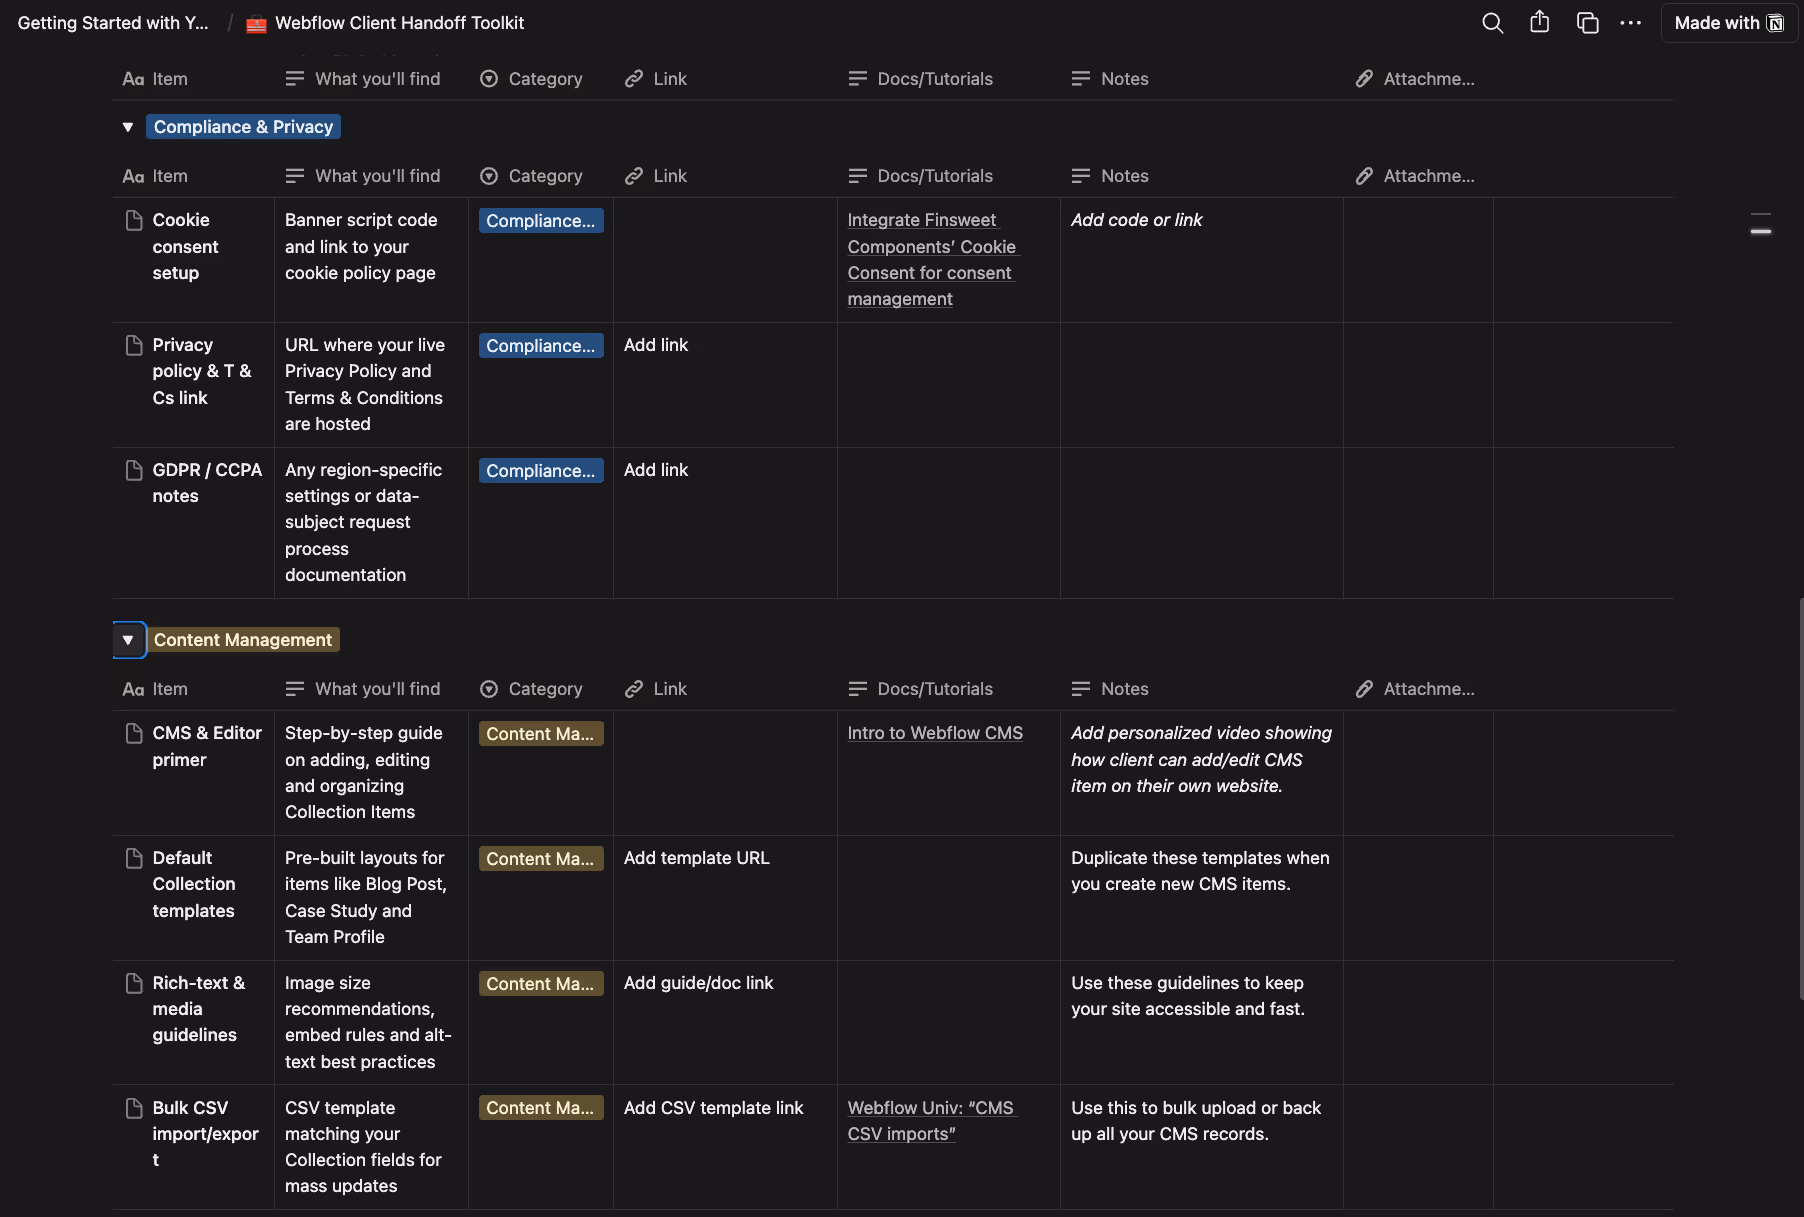
A single Notion database grouped by category. Each row shows what the item is, where to find it, and a short client note.
- Design & Source Files - Core design assets clients need. Example: Figma file and brand asset folder.
- Development & Deployment - Webflow ownership and key settings. Example: transfer link, preview and live URLs.
- Content Management - How to edit and bulk-manage content. Example: CMS primer and CSV template.
- SEO & Performance - Quick SEO and speed checks to run at launch. Example: meta tags and image optimisation tips.
- Redirects & URL Management - Preserve links and SEO when pages change. Example: 301 redirect CSV template.
- Support & Training - Client-facing help to reduce support load. Example: Loom walkthrough and Editor access guide.
- Analytics & Marketing - Tracking and dashboards for performance. Example: GA/GTM IDs and event notes.
- Compliance & Privacy - Legal essentials and cookie setup. Example: cookie banner script and policy link.
How to use the toolkit
- Duplicate the template - start a fresh copy for this project and rename it.
- Add Project Overview & team - client name, launch date, and who to contact.
- Paste high-impact links - Figma, brand assets, Webflow transfer, staging & live URLs, CMS templates.
- Attach the training - upload your Loom and link official docs for CMS, Editor and SEO.
- Mark safe edits - one-line notes next to fields: “safe to edit: text, image only.”
- Share with client - give view or comment access and offer a 10–15 minute walkthrough if needed.
Conclusion
Handing off a Webflow project should be the easiest part of a build. This toolkit gives you a single, organised workspace where design files, site links, training and launch checks live together. Use it to reduce follow-up questions, keep edits safe and speed up onboarding for clients and new team members.
Duplicate the Notion template, paste your project links, record a short walkthrough and share it with your client to make every handoff cleaner and faster.
Get the toolkit below.


.svg)


.svg)


.avif)


.avif)


.svg)


.avif)
%20and%20What%20Makes%20Them%20Work.avif)
.avif)


